How to Add a Program to Windows 10 Startup
It is possible make any App, Program or File to automatically startup with your computer. This can be done by adding the App or Program to the Startup Folder on your Windows computer.
Add App or Program to Startup in Windows 10
The main reason for adding an App, Program or File to Startup is to make that particular App, Program or File to Automatically startup with the computer and become available for your immediate use.
For example, if the first thing that you do every morning is to check Mail, you can make Microsoft Outlook to automatically startup with your computer and be ready for your use.
Similarly, if you are likely to work most of the times on a particular Microsoft Excel File, you can Add this File to Startup and make it available for use, as soon as you open the computer.
With this understanding, let us go ahead and take a look at different methods to Add an App, Program or File to Startup in Windows 10
1. Add Program to Startup Using Task Manager
Perhaps the easiest way to Add an App or Program to Startup in Windows 10 is to launch the program on your computer and use Task Manager.
1. Open the Program that you want to Add to Startup, either by clicking on its Desktop Icon (if available) or from Startup Menu.
2. Next, right-click on the Start button and select Task Manager in WinX menu.
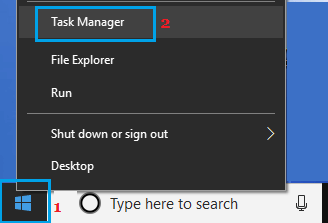
Note: You can also launch Task Manager by right-clicking anywhere on the Taskbar and selecting Task Manager in the menu.
3. On Task Manager screen, switch to Startup tab, right-click on the program that you would like to add to Startup and select Enable option in the contextual menu.
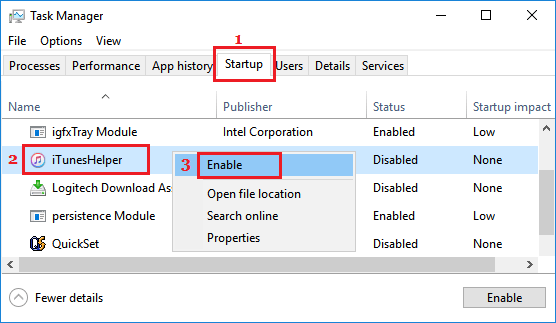
After this, you will now find this particular program Starting up automatically along with your computer.
2. Add Program to Startup Folder Using Run Command
Another way to Add an App or Program to Startup in Windows is to open the Startup Folder on your computer and drag the App or Program Icon to this Folder.
1. Right-click on the Start button and click on Run.
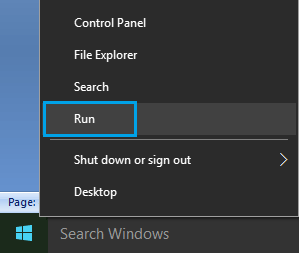
Note: You can also open Run Command by usingWin+R keyboard shortcut.
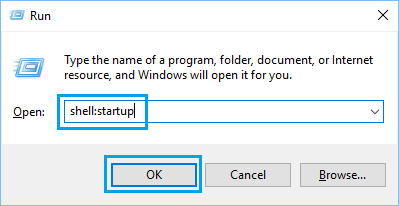
2. In Run Command window, type shell:startup and click on OK to open the Startup Folder on your computer.
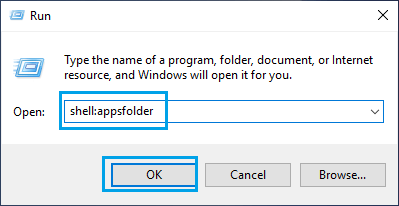
3. Next, openRun Command again > type shell:appsfolder and click on OK to open the modern Apps folder on your computer.
4. In the Apps Folder, locate the App that you want to Startup with your computer and drag it to the Startup Folder.

This will make this particular App to automatically launch, as soon as you start the computer and be ready for your use.
3. Add Excel or Word File to Startup in Windows 10
The procedure to Add any Microsoft Excel, Word or any other File to Startup is the same as adding any App or Program to Startup on a Windows computer.
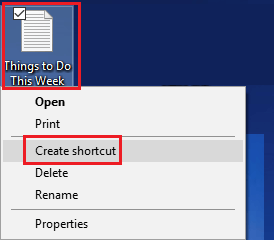
1. Right-click on the File and click on Create Shortcut option in the contextual menu.
2. Next, open Run Command > type shell:startup and click on OK to open the Startup Folder.

3. Now, drag the Shortcut that you had created into the Startup Folder.
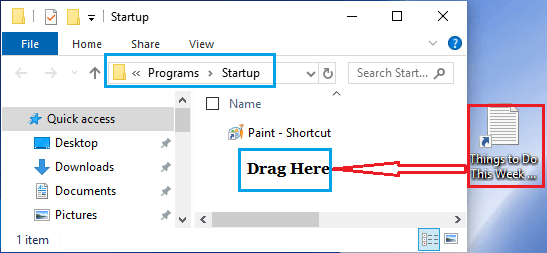
Note: You can also use Copy/Paste or Cut/Paste commands to copy the shortcut into the Startup Folder.
- How to Stop Skype From Starting Automatically in Windows 10
- How to Stop Apps from Running in Background in Windows 10
How to Add a Program to Windows 10 Startup
Source: https://www.techbout.com/add-app-program-to-startup-windows-43881/