How to Add C++ to Visual Studio 2019 After Installation
This browser is no longer supported.
Upgrade to Microsoft Edge to take advantage of the latest features, security updates, and technical support.
- Feedback
- Edit
Create a C++ extension for Python
- 18 minutes to read
Thank you.
Modules that are written in C++ (or C) are commonly used to extend the capabilities of a Python interpreter. They're also used to enable access to low-level operating system capabilities.
Modules come in three primary types:
- Accelerator modules: Because Python is an interpreted language, you can write accelerator modules in C++ for higher performance.
- Wrapper modules: These modules expose existing C/C++ interfaces to Python code or expose a more "pythonic" API that's easy to use from Python.
- Low-level system access modules: You can create these modules to access lower-level features of the
CPythonruntime, the operating system, or the underlying hardware.
This article walks you through building a C++ extension module for CPython that computes a hyperbolic tangent and calls it from Python code. The routine is implemented first in Python to demonstrate the relative performance gain of implementing the same routine in C++.
The article also demonstrates two ways to make the C++ extension available to Python:
- Use the standard
CPythonextensions, as described in the Python documentation. - Use PyBind11, which we recommend for C++11 because of its simplicity.
You'll find the completed sample from this walkthrough on GitHub at python-samples-vs-cpp-extension.
Prerequisites
-
Visual Studio 2017 or later, with the Python Development workload installed. The workload includes the Python native development tools, which bring in the C++ workload and toolsets that are necessary for native extensions.
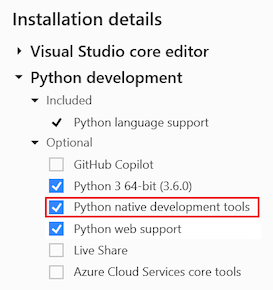
Note
When you install the Data science and analytical applications workload, Python and the Python native development tools option are installed by default.
For more information about the installation options, see Install Python support for Visual Studio. If you install Python separately, be sure to select Download debugging symbols under Advanced Options in its installer. This option is required for you to use mixed-mode debugging between your Python code and native code.
Create the Python application
-
Create a new Python project in Visual Studio by selecting File > New > Project. Search for Python, select the Python Application template, enter a name and location, and then select OK.
-
In the project's .py file, paste the following code. To experience some of the Python editing features, try entering the code manually.
This code computes a hyperbolic tangent without using the math library, and it's what you'll be accelerating with native extensions.
Tip
Write your code in pure Python before you rewrite it in C++. This way, you can more easily check to ensure that your native code is correct.
from random import random from time import perf_counter COUNT = 500000 # Change this value depending on the speed of your computer DATA = [(random() - 0.5) * 3 for _ in range(COUNT)] e = 2.7182818284590452353602874713527 def sinh(x): return (1 - (e ** (-2 * x))) / (2 * (e ** -x)) def cosh(x): return (1 + (e ** (-2 * x))) / (2 * (e ** -x)) def tanh(x): tanh_x = sinh(x) / cosh(x) return tanh_x def test(fn, name): start = perf_counter() result = fn(DATA) duration = perf_counter() - start print('{} took {:.3f} seconds\n\n'.format(name, duration)) for d in result: assert -1 <= d <= 1, " incorrect values" if __name__ == "__main__": print('Running benchmarks with COUNT = {}'.format(COUNT)) test(lambda d: [tanh(x) for x in d], '[tanh(x) for x in d] (Python implementation)') -
To view the results, run the program by selecting Debug > Start without Debugging or by selecting Ctrl+F5.
You can adjust the
COUNTvariable to change how long the benchmark takes to run. For the purpose of this walkthrough, set the count so that the benchmark takes about two seconds.Tip
When you run benchmarks, always use Debug > Start without Debugging. This helps avoid the overhead that you incur when you run the code within the Visual Studio debugger.
Create the core C++ projects
Follow the instructions in this section to create two identical C++ projects, superfastcode and superfastcode2. Later, you'll use a separate approach in each project to expose the C++ code to Python.
-
In Solution Explorer, right-click the solution, and then select Add > New Project. A Visual Studio solution can contain both Python and C++ projects, which is one of the advantages of using Visual Studio for Python.
-
Search on C++, select Empty project, specify either superfastcode for the first project or superfastcode2 for the second project, and then select OK.
Tip
Alternatively, with the Python native development tools installed in Visual Studio, you can start with the Python Extension Module template. The template has much of what's described here already in place.
For this walkthrough, though, starting with an empty project demonstrates building the extension module step by step. After you understand the process, you can use the template to save time when you write your own extensions.
-
To create a C++ file in the new project, right-click the Source Files node, and then select Add > New Item.
-
Select C++ File, name it module.cpp, and then select OK.
Important
A file with the .cpp extension is necessary to turn on the C++ property pages in the steps that follow.
-
On the main toolbar, use the dropdown menu to do either of the following:
- For a 64-bit Python runtime, activate the x64 configuration.
- For a 32-bit Python runtime, activate the Win32 configuration.
-
In Solution Explorer, right-click the C++ project, select Properties, and then do the following:
a. For Configuration, enter Active (Debug).
b. For Platform, enter either Active (x64) or Active (Win32), depending on your selection in the preceding step.Note
When you create your own projects, you'll want to configure both the debug and release configurations. In this unit, you're configuring only the debug configuration and setting it to use a release build of CPython. This configuration disables some debugging features of the C++ runtime, including assertions. Using CPython debug binaries (python_d.exe) requires different settings.
-
Set the properties as described in the following table:
Tab Property Value General Target Name Specify the name of the module to refer to it from Python in from...importstatements. You use this same name in the C++ code when you define the module for Python. To use the name of the project as the module name, leave the default value of $<ProjectName>. Forpython_d.exe, add_dto the end of the name.Configuration Type Dynamic Library (.dll) Advanced > Target File Extension .pyd Project Defaults > Configuration Type Dynamic Library (.dll) C/C++ > General Additional Include Directories Add the Python include folder as appropriate for your installation (for example, c:\Python36\include).C/C++ > Preprocessor Preprocessor Definitions If it's present, change the _DEBUG value to NDEBUG to match the non-debug version of CPython. When you're using python_d.exe, leave this value unchanged. C/C++ > Code Generation Runtime Library Multi-threaded DLL (/MD) to match the non-debug version of CPython. When you're using python_d.exe, leave this value as Multi-threaded Debug DLL (/MDd). Linker > General Additional Library Directories Add the Python libs folder that contains .lib files, as appropriate for your installation (for example, c:\Python36\libs). Be sure to point to the libs folder that contains .lib files, and not the Lib folder that contains .py files. Tab Property Value General General > Target Name Specify the name of the module to refer to it from Python in from...importstatements. You use this same name in the C++ code when you define the module for Python. To use the name of the project as the module name, leave the default value of $<ProjectName>. Forpython_d.exe, add_dto the end of the name.General > Target Extension .pyd Project Defaults > Configuration Type Dynamic Library (.dll) C/C++ > General Additional Include Directories Add the Python include folder, as appropriate for your installation (for example, c:\Python36\include). C/C++ > Preprocessor Preprocessor Definitions If it's present, change the _DEBUG value to NDEBUG to match the non-debug version of CPython. When you're usingpython_d.exe, leave this value unchanged.C/C++ > Code Generation Runtime Library Multi-threaded DLL (/MD) to match the non-debug version of CPython. When you're usingpython_d.exe, leave this value unchanged.Linker > General Additional Library Directories Add the Python libs folder that contains .lib files, as appropriate for your installation (for example, c:\Python36\libs). Be sure to point to the libs folder that contains .lib files, and not the Lib folder that contains .py files. Note
If the C/C++ tab isn't displayed in the project properties, the project contains no files that it identifies as C/C++ source files. This condition can occur if you create a source file without a .c or .cpp file extension.
For example, if you accidentally entered module.coo instead of module.cpp earlier in the new item dialog, Visual Studio creates the file but doesn't set the file type to C/C+ Code, which activates the C/C++ properties tab. Such misidentification remains even if you rename the file with a .cpp file extension.
To set the file type properly, in Solution Explorer, right-click the file and select Properties. Then, for File Type, select C/C++ Code.
-
Select OK.
-
To test your configurations (both debug and release), right-click the C++ project, and then select Build.
You'll find the .pyd files in the solution folder, under Debug and Release, not in the C++ project folder itself.
-
In the C++ project's module.cpp file, add the following code:
#include <Windows.h> #include <cmath> const double e = 2.7182818284590452353602874713527; double sinh_impl(double x) { return (1 - pow(e, (-2 * x))) / (2 * pow(e, -x)); } double cosh_impl(double x) { return (1 + pow(e, (-2 * x))) / (2 * pow(e, -x)); } double tanh_impl(double x) { return sinh_impl(x) / cosh_impl(x); } -
Build the C++ project again to confirm that your code is correct.
-
If you haven't already done so, repeat the preceding steps to create a second project named superfastcode2 with an identical configuration.
Convert the C++ projects to extensions for Python
To make the C++ DLL an extension for Python, you first modify the exported methods to interact with Python types. You then add a function that exports the module, along with definitions of the module's methods.
The sections that follow explain how you perform these steps by using both the CPython extensions and PyBind11.
Use CPython extensions
For more background on the code shown in this section, see the Python/C API Reference Manual and, especially, the Module Objects page. Be sure to select your version of Python in the dropdown list at the upper right.
-
At the top of the module.cpp file, include Python.h:
#include <Python.h> -
Modify the
tanh_implmethod to accept and return Python types (that is, aPyObject*):PyObject* tanh_impl(PyObject* /* unused module reference */, PyObject* o) { double x = PyFloat_AsDouble(o); double tanh_x = sinh_impl(x) / cosh_impl(x); return PyFloat_FromDouble(tanh_x); } -
Add a structure that defines how the C++
tanh_implfunction is presented to Python:static PyMethodDef superfastcode_methods[] = { // The first property is the name exposed to Python, fast_tanh // The second is the C++ function with the implementation // METH_O means it takes a single PyObject argument { "fast_tanh", (PyCFunction)tanh_impl, METH_O, nullptr }, // Terminate the array with an object containing nulls. { nullptr, nullptr, 0, nullptr } }; -
Add a structure that defines the module as you want to refer to it in your Python code, specifically when you use the
from...importstatement.The name that's being imported in this code should match the value in the project properties under Configuration Properties > General > Target Name.
In the following example, the
"superfastcode"module name means that you can usefrom superfastcode import fast_tanhin Python, becausefast_tanhis defined withinsuperfastcode_methods. File names that are internal to the C++ project, such as module.cpp, are inconsequential.static PyModuleDef superfastcode_module = { PyModuleDef_HEAD_INIT, "superfastcode", // Module name to use with Python import statements "Provides some functions, but faster", // Module description 0, superfastcode_methods // Structure that defines the methods of the module }; -
Add a method that Python calls when it loads the module, which must be named
PyInit_<module-name>, where <module-name> exactly matches the C++ project's General > Target Name property. That is, it matches the file name of the .pyd file that's built by the project.PyMODINIT_FUNC PyInit_superfastcode() { return PyModule_Create(&superfastcode_module); } -
Build the C++ project again to verify your code. If you encounter errors, see the "Troubleshooting" section.
Use PyBind11
If you completed the steps in the previous section, you certainly noticed that you used lots of boilerplate code to create the necessary module structures for the C++ code. PyBind11 simplifies the process through macros in a C++ header file that accomplish the same result, but with much less code.
For more information about the code in this section, see PyBind11 basics.
-
Install PyBind11 by using pip:
pip install pybind11orpy -m pip install pybind11.Alternatively, you can install PyBind11 by using the Python Environments window, and then use its Open in PowerShell command for the next step.
-
In the same terminal, run
python -m pybind11 --includesorpy -m pybind11 --includes.This prints a list of paths that you should add to your project's C/C++ > General > Additional Include Directories property. Be sure to remove the
-Iprefix, if it's present. -
At the top of a fresh module.cpp that doesn't include any of the changes from the previous section, include pybind11.h:
#include <pybind11/pybind11.h> -
At the bottom of module.cpp, use the
PYBIND11_MODULEmacro to define the entry point to the C++ function:namespace py = pybind11; PYBIND11_MODULE(superfastcode2, m) { m.def("fast_tanh2", &tanh_impl, R"pbdoc( Compute a hyperbolic tangent of a single argument expressed in radians. )pbdoc"); #ifdef VERSION_INFO m.attr("__version__") = VERSION_INFO; #else m.attr("__version__") = "dev";